CAROLINE.PARK
PORTFOLIO
FROM MUXBOX TO MAYA : EXTRACT TEXTURE MAPS
++++++++++++++++++++++++++++++++++++++++++++++++++++++++++
When I have completed the old man's head sculpting, the polygon shape was pretty much changed. So I had to send low resolution mesh from Mudbox to Maya. And I had to check uv texture that is changed the shape of the polygon. I updated the polygon to Mudbox. After that time I extracted displacement map. And I applied it on maya material.
When we extract texture map, We have to select different option, depending on objects. So I tested several options. I was able to see the problem like those photos according to options. And Render options were important too. I used Mental ray of render applications.
 Maps to Generate : Displacement Map Method : Ray casting Choose Samples : Closest to lowres mesh Image Size : 4096 X 4096 Antialiasing : 2X FILE TYPE : Open EXR Base per Channel : 32-Bit FP |  Maps to Generate : Displacement Map Method : Ray casting Choose Samples : Closest to lowres mesh Image Size : 2048 X 2048 Antialiasing : 2X FILE TYPE : Open EXR Base per Channel : 32-Bit FP |  Maps to Generate : Displacement Map Method : Ray casting Choose Samples : Furthest inside Image Size : 2048 X 2048 Antialiasing : 2X FILE TYPE : Open EXR Base per Channel : 32-Bit FP |
|---|---|---|
 Maps to Generate : Displacement Map Method : Ray casting Choose Samples : Furthest outside Image Size : 2048 X 2048 Antialiasing : 2X FILE TYPE : Open EXR Base per Channel : 32-Bit FP |


Extract a displacement map
The following options are the best way of my object.
1. From the main menu, select UVs & Maps > Sculpt Using Map > New Operation
2. Select Displacement Map
3. Select the source
4. Listed Target models low resolution mesh, Source models high resolution mesh
Use the Add All, Add Selected, and Remove buttons to change the model listed as
the source
5. Turn on Smooth Target Models, Use Creases & Hard Edges Buttons
6. Turn off Smooth Target UVs, Smooth Source Models Buttons
7. Select Ray Casting of Methd options
8. Select Closet to lowres mesh of Choose Samples
Note I tested other options. the best option was Closet to lowres mesh.
when you extract displacement map, you have to find best option
of your object. Default option is futherst outside.
9. Push Best Guess button
10. Turn on Test Both Sides Button
11. Select Generate one map for all targets
12. Select 4096 X 4096 of Image Size options
Note A larger Image Size produces more detail in the map, but increases
extraction time and file size.
13. Select 2X of Antialiasing options
Note When on, improves the quality of the final extracted image map.
Higher values increase the amount of antialiasing that occurs and
the time to extract the image map.
14. Turn off Normalize to Search Distance button
15. Select Texture of Map Type options.
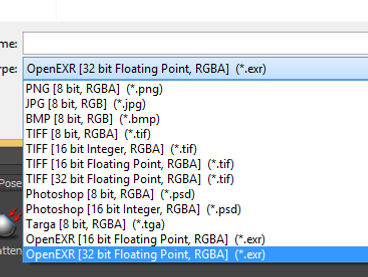
16. Designate file format OpenEXR [32 bit Floating Point, RGBA] (*.exr)
For more information, Move the following address
MUDBOX 2014
http://download.autodesk.com/global/docs/mudbox2014/en_us/index.html?url=files/GUID-A602E288-A771-4225B67B6034CCFDF916.htm,topicNumber=d30e31225
Displacement map & Normal map in Maya
The following is applied to displacement map and normal map test image. Displacement map make sculpting shape. And Normal map make details. When I applied normal map, I was able to make more details. So You have to select map according to circumstances.

Color
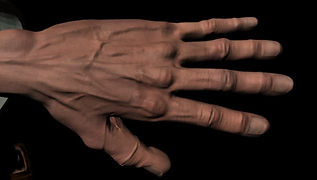

Color + Displace ment map
color + Displace ment map + Normal map


APPLY Displacement map & Normal map in Maya
The following options are the basic method of applying displacement map and normal map.

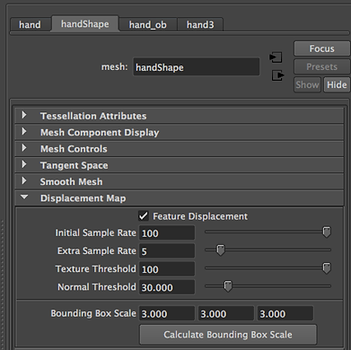
1. Select object, Change figure of object's Displacement map menu.
Note Intial Sample Rate : 6 -> 100
Texture Threshold : 0 -> 100
Bounding Box scale : 1.5 / 1.5 / 1.5 -> 3 / 3 / 3
According to the figure, you could get different result. You could control to match the situation.
In my case, the result was best when I used this figure.

2. Open hypershade, Open material.
Note We applied displacement map and
normal map. The node is as follows.
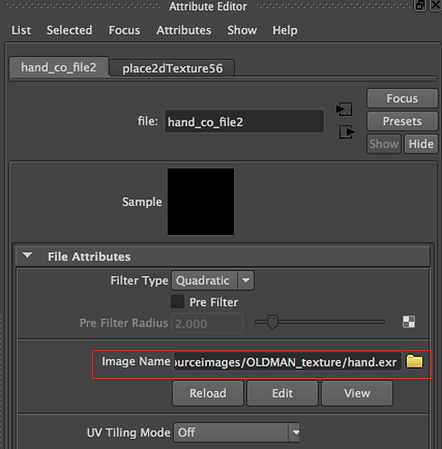
3. Dubble click material, Open color file
4. Designation image file
5. Open displacement map shader
6. Designation displacement map file
7. Open Bump attribute
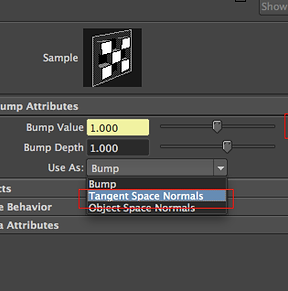
8. Designation Normalmap file.
9. Select Tangent Space Normals of use as menu


Displacement map


Normal map