CAROLINE.PARK
PORTFOLIO
RENDER PASSES
+++++++++++++++++++++
While proceeding my old man project, I thought how important is realistic expression.
So I searched on the Internet about it. I was able to read some useful articles which are concerning Render pass. When we extract render pass, we are able to control figure of each layer. So it is possible to make natural composite scene.
I attempted to get render passes in maya. I needed some objects for testing. So I made three objects in maya.
When I used Mental ray material, I had to select ‘mia_material_x_passes’ for render passes.
If you use Mental Ray material which is not marked ‘passes’. You can not available render pass.
There are many type of render passes. We can select passes according to circumstance.
I selected Render passes which are using normally.
I compared maya render image and compositing render passes image. Maya render image is very flat. When I made separated render passes.
I was able to control figure of each passes. So I was able to express better quality image.
Multi-render passes reduce the need to use render layers, thus reducing compute times for scene translation and rendering. If you work with complex multi-layered compositions, rendering may also be several times faster.
In conclusion, render passes reduce render time and besides making better quality image.
Commonly User utilize AO, diffuse, shadow, specular and reflection passes. According to circumstance we are able to use other passes.
3D modeling program : Autodesk Maya
Compositing program : Adobe After Effects

Compositing Render passes Image

Maya Render Image

Ambient Occlusion A shading method which attempts to approximate the way light radiates in the real world, particularly off what are normally thought of as non-reflective or matte surfaces. By adding Ambient Occlusion (AO) to Master Beauty and other passes, the resulting output is very realistic lighting and rendering.

Ambient Ambient contribution of the surface. In Maya, this is the material color multiplied by the ambient light color.


Master beauty This is the output you normally get when rendering without any render passes in a 3D scene or 3D file.
Master beauty pass includes everything in the scene. It is automatically generated when you extract render passes.
Beauty = Master beauty, Default pass


Diffuse Diffuse shading of material. The diffuse pass contains the diffuse and ambient information and is modulated by color, transparency, and Diffuse Coeff (diffuse coefficient).
Direct Irradiance Direct light arriving at each sample location.

Indirect Indirect lighting from final gather, global illumination, and caustics.

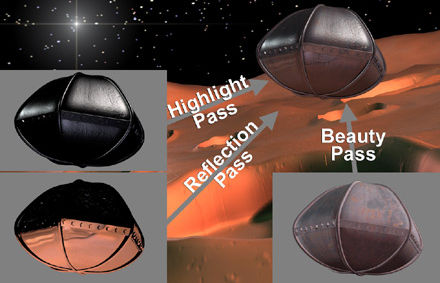
Reflection Reflection pass and Refraction pass can also be rendered out separately, just like the specular pass.The way to add these in post process is by using either Screen, Overlay, Soft Light or Hard Light etc. based on output need.

Shadow Produces only the shadow component of the image. Pure shadow contribution for both self-shadowing as well as direct shadows. The shadow pass can be luminance or colored shadows. Takes into account material contributions.
The Shadow passes need to be used with Multiply, Color Burn or Linear Burn.

Specular Rendering highlights of objects. In general, highlights can be seen on shiny and rounded objects. Highlights can also be seen on flat surfaces when a bright light shines on it. Only specular shading is performed. The specular component is modulated differently depending on the type of material associated with the object. Phong, PhongE, Blinn, and Anisotropic materials produce specular contributions differently. On a Phong material, the specular pass can be modulated using cosine power, and specular color.
The following pages are explanation about glossary of 3D. The meaning of terms on this page been extracted.
3D Rendering and Render passes explanation for clients
http://www.navigatorartisticstudio.in/blog/news/3d-rendering-render-passes-explanation-clients/
Multi-render passes
http://knowledge.autodesk.com/support/maya/learn-explore/caas/CloudHelp/cloudhelp/2015/ENU/Maya/files/GUID-9BF67900-7FD6-463C-A8C9-9D29B95FC535-htm.html
Work with render passes
http://download.autodesk.com/us/maya/2009help/index.html?url=Visualize_and_render_images_Render_passes.htm,topicNumber=d0e592886

Extract Render passes
The following options are basic render passes options.
1. Open, Render Settings
2. From the menu, Select Passes
3. Click add new passes button
4. Select passes ambient Occlusion, ambient, beauty, diffuse,
direct irradiance, indirect, reflection, shadow, specular
Note You have to select options according to circumstances.
5. Click Associate selected passes with crrent render layer button
6. From the menu, Select Indirect Lighting
7. Turn on Ambient Occusion
Note When you need Ambient Occusion pass, you have to turn it on.
8. From Render menu, Select mental ray Batch Render option
9. Click Batch render and close button


Compositing Render passes in After Effects
I loaded all the different rendered layers into a compositing program, After Effects. I controlled opacity figure and mode of each layer. According to circumstances, we have to control different figure and mode of each layer.

DEPTH PASS
Depth pass is an image or image channel that contains information relating to the distance of the surfaces of scene objects from a viewpoint.
Depth pass is possible to control figure of distance of the surfaces of scene objects. So we are able to make depth of image. Depth pass is important. The following is depth pass how to make in Mental Ray for Maya.
After rendering I brought the images into After effects to utilize them.
Depth pass is different other passes. I had to use another method. The way is as follows.


1. From the Panel Layout menu, Check Objects>Geometry
2. Select Geometry
Note You have to select object according to circumstances.
3. Click Create new layer and assign selected objects button
4. Change the layer name ‘Depth’


5. Open Attribute Editor of Depth layer
6. Select Luminance Depth of Presets menu
7. Open Hypershade, Select surfaceShader


8. Select Out Color of surfaceShader
9.From the Set Range Attributes, Break Connection figure of Old Min and Old Max
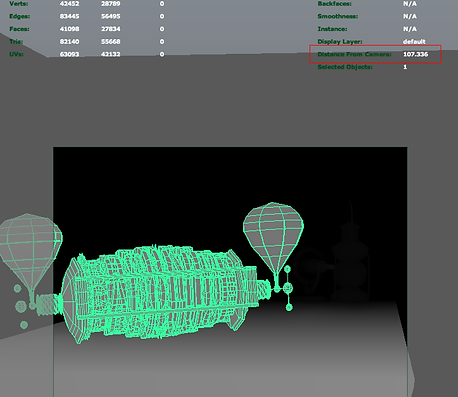
10. Check the Distance From Camera figure of object
11. Change the figure of Old Min and Old max
Note According to the figure, you could get different result. You could control to match the situation.


12. From the Render Settings, Select Render Layer ‘Depth’
Select Render Using 'Mental Ray'
Select Image format ‘OpenEXR(exr)’
13. From Render menu, Select mental ray Batch Render option
14. Click Batch render and close button


Compositing Depth pass in After Effects
I loaded MasterBeauty pass and Depth pass into After Effects. I could use the Camera Lens Blur available in the effects menu for different results. According to different figure of Camera Lens Blur, I could control the blur point.


MasterBeauty
Depth Depth pass is the fastest rendering pass, it takes just seconds to render and can give a look of the most expensive to render which is depth of field and also we can use it to create fog.


1. Create sequence, Put MasterBeauty pass and Depth pass in sequence.
2. Change TrkMat mode of MasterBeauty ‘Alpha’
3. Create Adjustment Layer, Select Camera Lens Blur effect in Adjustment Layer.
4. Select Depth layer of Blur Map Layer option
5. Control figure of Blur Focal Distance
Note Figure is 1, the focus is in front. In contrast, Figure is 0, the focus is behind.
According to the figure, you could get different result.You could control to match the situation.
USING RENDER LAYER
Multi-render passes reduce the need to use render layers, thus reducing compute times for scene translation and rendering. If you work with complex multi-layered compositions, rendering may also be several times faster. Furthermore, you can also select a subset of the objects or lights in your scene to contribute to each render pass. Big and heavy when revising the scene, you can reduce the time using render passes.
You don't need to extract every passes. You extract them only a necessary layer. For example. when you want to change color of object. you extract only related color layers. I used mia_material_x_passes of Mental ray material. When I extract render layer which are AO, shadow, diffuse, specular and reflection. But AO layer is just working except other layers. I found in the Internet about this problem. Some people had same problem. I extract image using render passes. If you want to make shadow or other passes using render layer. You have to change material on render layer.

Extract Render passes
The following options are basic render passes options.
1. Select object and light
Note You have to select object that you want to make render layer.
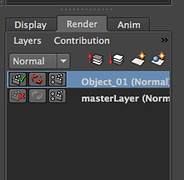
2. Click Create new layer and assign selected objects button
3. Change the layer name ‘Object_01’
Note You are able to change the name which you want to
4. Open, Render Settings
5. From the Render Settings, Select Render Layer ‘Object_01’
Select Render Using 'Mental Ray'
6. From the menu, Select Passes
7. Click add new passes button
8. Select passes Ambient Occlusion, diffuse, reflection, shadow, specular
Note You have to select options according to circumstances.
9. Click Associate selected passes with crrent render layer button
10. From the menu, Select Indirect Lighting
11. From Render menu, Select mental ray Batch Render option
12. Click Batch render and close button
13. Turn on Ambient Occusion
Note When you need Ambient Occusion pass, you have to turn it on.
14. From Render menu, Select mental ray Batch Render option
15. Click Batch render and close button


Ambient Occlusion

Diffuse

Reflection

RawShadow Similar to the Shadow pass but calculated only with respect to the irradiance in the scene.

Specular

MasterBeauty
Compositing Render passes in After Effects
I loaded all the different rendered layers into a compositing program, After Effects. I controlled opacity figure and mode of each layer. According to circumstances, we have to control different figure and mode of each layer.

REFERENCE
+++++++++++++++++++++
10 key tips for lighting and look development
Wednesday, October 31st, 2012 | Author Posted by Jim Thacker
http://www.cgchannel.com/2012/10/10-tips-for-lighting-and-look-development
I thought as I began working on OLDMAN project. It is very important that how to realistic image expression. So I searched about 3D reality. I saw this article.
This article is written by Cosku Turhan who is Senior Lead Technical Director in Sony Pictures Imageworks. He said that several tip about lighting and render passes for realistic expression.


Render Pass Concepts and Techniques
Autodesk and Maya are registered trademarks or trademarks of Autodesk, Inc., and/or its subsidiaries and/or affiliates in the USA and/or other countries. mental ray is a registered trademark of mental images GmbH licensed for use by Autodesk, Inc. Python is a registered trademark of Python Software Foundation. All other brand names, product names, or trademarks belong to their respective holders.
Autodesk reserves the right to alter product and services offerings, and specifications and pricing at any time without notice, and is not responsible for typographical or graphical errors that may appear in this document. © 2010 Autodesk, Inc. All rights reserved.
http://images.autodesk.com/adsk/files/maya_render_pass_concepts_and_techniques_whitepaper_us.pdf
This data is made by Autodesk for people who use Autodesk maya. This data is detailed explanation of render passes. Not only that there is expression how to use compositing program such as Autodesk Flame.


Render Passes, Layers, 3D compositing
Copyright © 2000-2006 by Jeremy Birn.
http://3drender.com/light/compositing/index.html
This page is short explanation type of render passes. It is easy to help understanding about render passes.
