
CAROLINE.PARK
PORTFOLIO
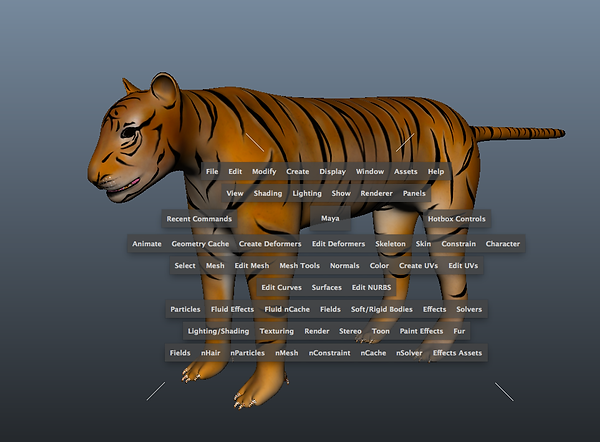
Animal's fur by using Maya fur
+++++++++++++++++++++++++++++++++
I'm in progress of Mr.K project. I need a tiger character for my story. Tiger has fur. So I think how to explain tiger’s fur is the most important. I have to use tool of hair or fur. It is necessary to make natural expression of tiger’s fur. For example, X-gen, maya fur, nhair, Shave and a Haircut . Especially, I want to try maya fur tool first.
I wanted try another method. But when I tried X-gen fur, there was render problem. I wasn’t able to see texturing. So I found about the problem on the internet. There are some people who have the same problem. They did x-gen fur using mental-ray, it was not working. I couldn’t find the solution.
There is another method which is Shave and a Haircut. But I couldn’t use it. Because the developer is no longer developing it. It wasn’t working in my maya version. The last version is maya 2014. I’m using maya 2015 version.
In conclusion, I was able to use only maya fur. Maya fur is simple and easy.
But I had to try a lot for making natural shape. But it is essential to make natural shape. Furthermore, when I used maya software of render it was faster than mental ray of render. But the greater the number of fur I needed more time.


Autodesk Maya | Maya fur | Mental-ray
Create Maya fur
The following options are the basic method of my tiger.
1. Select object, Open menu of fur
Note Normally we use Viewport 2.0. But we can't see the result of maya fur.
When we use maya fur. We have to turn on Legacy Default Viewport of Renderer to see preview.

2. Create fur, Select Attrach Fur Description of fur menu
Select new of Attrach Fur Description menu

3. Select Edit Fur Description of fur menu, Modify options to make fur expression
Note Using this menu, We can control each options of Maya fur. It is possible to make styles. Whatever we want.

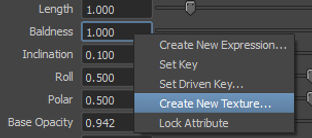

Bake : Click this button to bake the attributes specified in the Bake Attribut drop-down list.
Base Color, Tip Color, Base Ambient Color, Specular Color :
We can modify options of colours and importing file textures.
According to the figure, we can make different fur styles using this menu. Mainly we use value of each option. Depending on circumstance, we can import file textures.

Color texture

Baldness texture
NOTE In my case, I used texture of Baldness for removing fur of eyes and lip. Tiger doesn't have fur on there.
If we want to remove fur of some part. The place you have to make it black. After making the map,
we are able to apply for the menu.

Randomly vary fur attribute values
For a more natural effect, you can randomly vary the attribute values of each hair making up a fur description using noise amplitude and noise frequency. Noise amplitude refers to the variance of an attribute, and noise frequency refers to the amount of variance over a distance or area. You can set noise amplitude and noise frequency for all attributes. (by Autodesk page)
NOTE We can modify the attribute values of each options. When we use this options. We can make more natural styles.
FurCurveAttractors node
More information is in these pages.
http://knowledge.autodesk.com/support/maya/learn-explore/caas/CloudHelp/cloudhelp/2015/ENU/Maya/files/GUID-103F2309-4FE9-47E4-8A78-D358D88BA33C-htm.html
Change fur curve attractor set attributes
http://knowledge.autodesk.com/support/maya/learn-explore/caas/CloudHelp/cloudhelp/2015/ENU/Maya/files/GUID-65BAE32F-8DBE-4CEC-8346-C67733906FC3-htm.html
3. Using Paint Fur Description of fur menu
Note We can choose each option of Fur Attribute menu. It is easy to modify values of Fur Attribute using paint tool.
We can see the preview shape.


NOTE I wanted to make more detail of tiger's head fur. So, I attached another polygon on head.
I had to make separately on there. Because Jaw's fur is looks quite different.
It is difficult to express the shapes of two using one option.
When we want to make different style of fur, we should make another polygon.
Maya Monday - Maya 2015 XGen - Fur or short hair
https://youtu.be/u7ijzPEtIyY
This page is tutorial that how to make tiger's fur of using x-gen.


Maya software

Mental-ray

Renderman
NOTE When I found some information of maya fur, there was article about Renderman. So I compared render images which are maya software render image, Mental-ray image and Renderman image. Depending on type of render, I saw quite different results. Render speeds were different. Maya software was the fastest and Renderman was the slowest. When I tried Renderman, I needed a lot of time. However, the fur shape was better than other things.
RENDERMAN - Hair and Fur
http://renderman.pixar.com/view/hair-and-fur
Pixar has made hair and fur during the production of movies like Monsters Inc, Ratatouille, and Up. In the process, Pixar has developed expression of fur & hair
to more natural expression. Rendering fur with RenderMan could not be easier. Without any extra setup. They normally used fur and hair directly from Autodesk's Maya with RenderMan Studio. They are also compatible with Joe Alter's Shave and a Haircut.

RENDERMAN - King Kong: Shading Fur
http://renderman.pixar.com/view/kingkong-shadingfur
King Kong character of King Kong movie was made at Weta Digital. The artists of Weta Digital used the Renderman. When they created characters, many requiring test procedures, taking into account the conditions to be synthesized in the movie. This article describe the process that how created the natural character's fur.


3D MAX hair & fur
When I found some information of maya fur, there was article about 3D MAX hair & fur tool like Ornatrix, Hair Farm. It is possible to express natural hair. Furthermore, Ornatrix widely used in the game sector.


Making Of Cartier Winter Tale
http://www.cgmeetup.net/home/making-of-cartier-wintertale/
3D max, hair-farm


